This winter I participated in our local neighborhood winter bazaar. I had a blast and really enjoyed talking to people about my art and crafting. So this weekend is the spring bazaar and I am getting ready to join in again! This time, I decided to actually plan my set-up because last time I was a little unprepared since I had never done one before. So, how do I get ready for a table at a craft fair?? Well today, I got out a white sheet as the base to cover the table. I found my grandmother's old suitcase, a couple of little metal shelves from ikea, a crate, some old frames and my light up star. Then I made a cute little no-sew bunting with fabric and stitch-witchery -love it! I also have my preschool bookcase display!
I filled a couple of jars with buttons and spools of thread. Then gave them cute fabric tops just to have out as decoration. I hung a couple of little watercolors and glass heart ornaments in the frames.
I made price tags ... this is the hardest part for me. I read a couple of articles about pricing handmade arts and gifts ... hope I did okay!
Here is my preschool bookcase display - I sure do love this thing!! It also has great storage on the back!!
Wish me luck!! 20% of my sales go to support Habitat for Humanity and the rest goes towards supporting my art habit!!!
(And make sure to check back here to find out how I did and my next Faber-Castell design on the 30th!!)
I am so excited that spring is almost here!! I can't wait to work at my art desk and stare out at green trees and grass instead of boring brown and gray! Here is a little happy bunny picture that I made for my post at the Eclectic Paperie today.- I mean what doesn't say spring more than cute bunnies and bunting flags!!
"Begin each day with a little courage, a little curiosity, and a little spring in your step!"
I always start off with my sketchbook. I knew I wanted a bunny, I just didn't know what type to draw.
For Christmas my mom gave me a box of pieces of wood 'canvas' pieces! I must be really easy to please because this was one of the best Christmas presents!! I used one of these wood pieces as my base. I took some teal paint and mixed it with white and covered the whole piece with the teal/white mix. Then I used the Chevron Grunge stencil with just teal to create my background!
Next I took out the Simple Stories Daily Grind Paper. I cut out the triangles for bunting and tore the green for the grass. I used gel medium and glued all the pieces down.
After the paper was dry I took my Wendy Vecchi embossing paste and made little circles with my fingers. After the paste dried I painted it with coordinating colors! Love how the embossing paste gives me some texture to my project!
I printed out a little saying, "Begin each day with a little courage, a little curiosity, and a little spring in your step!" Then I doodled and used some rub-ons to finish the project!!
I hope you all have a very happy day and a wonderful weekend!! Thank you SO much for stopping by my blog today. Make sure you also stop by the wonderful Eclectic Paperie today! Kim has a wonderful selection of mixed media paper, paint, pens, glue ... all the things I love! You can click on the thumblinky's below to check out all the wonderful products that I used for this project!
4 Days until I drive to Charlotte NC, to take part in Junelle Jacobson's weekend at the Donna Downey studios!! I am SO, SO, SO, SO, SO excited, I feel like it is Christmas and I am a five year old waiting for my Barbie Dream house!!!
If any of you don't know who Junelle Jacobson is . . . you are really missing out. She is an amazing teacher. Every online class that I have taken from her has taught me SO much about art and about myself. Here is a link to her blog ... check it out ... take some of her classes, you will be so glad you did!!
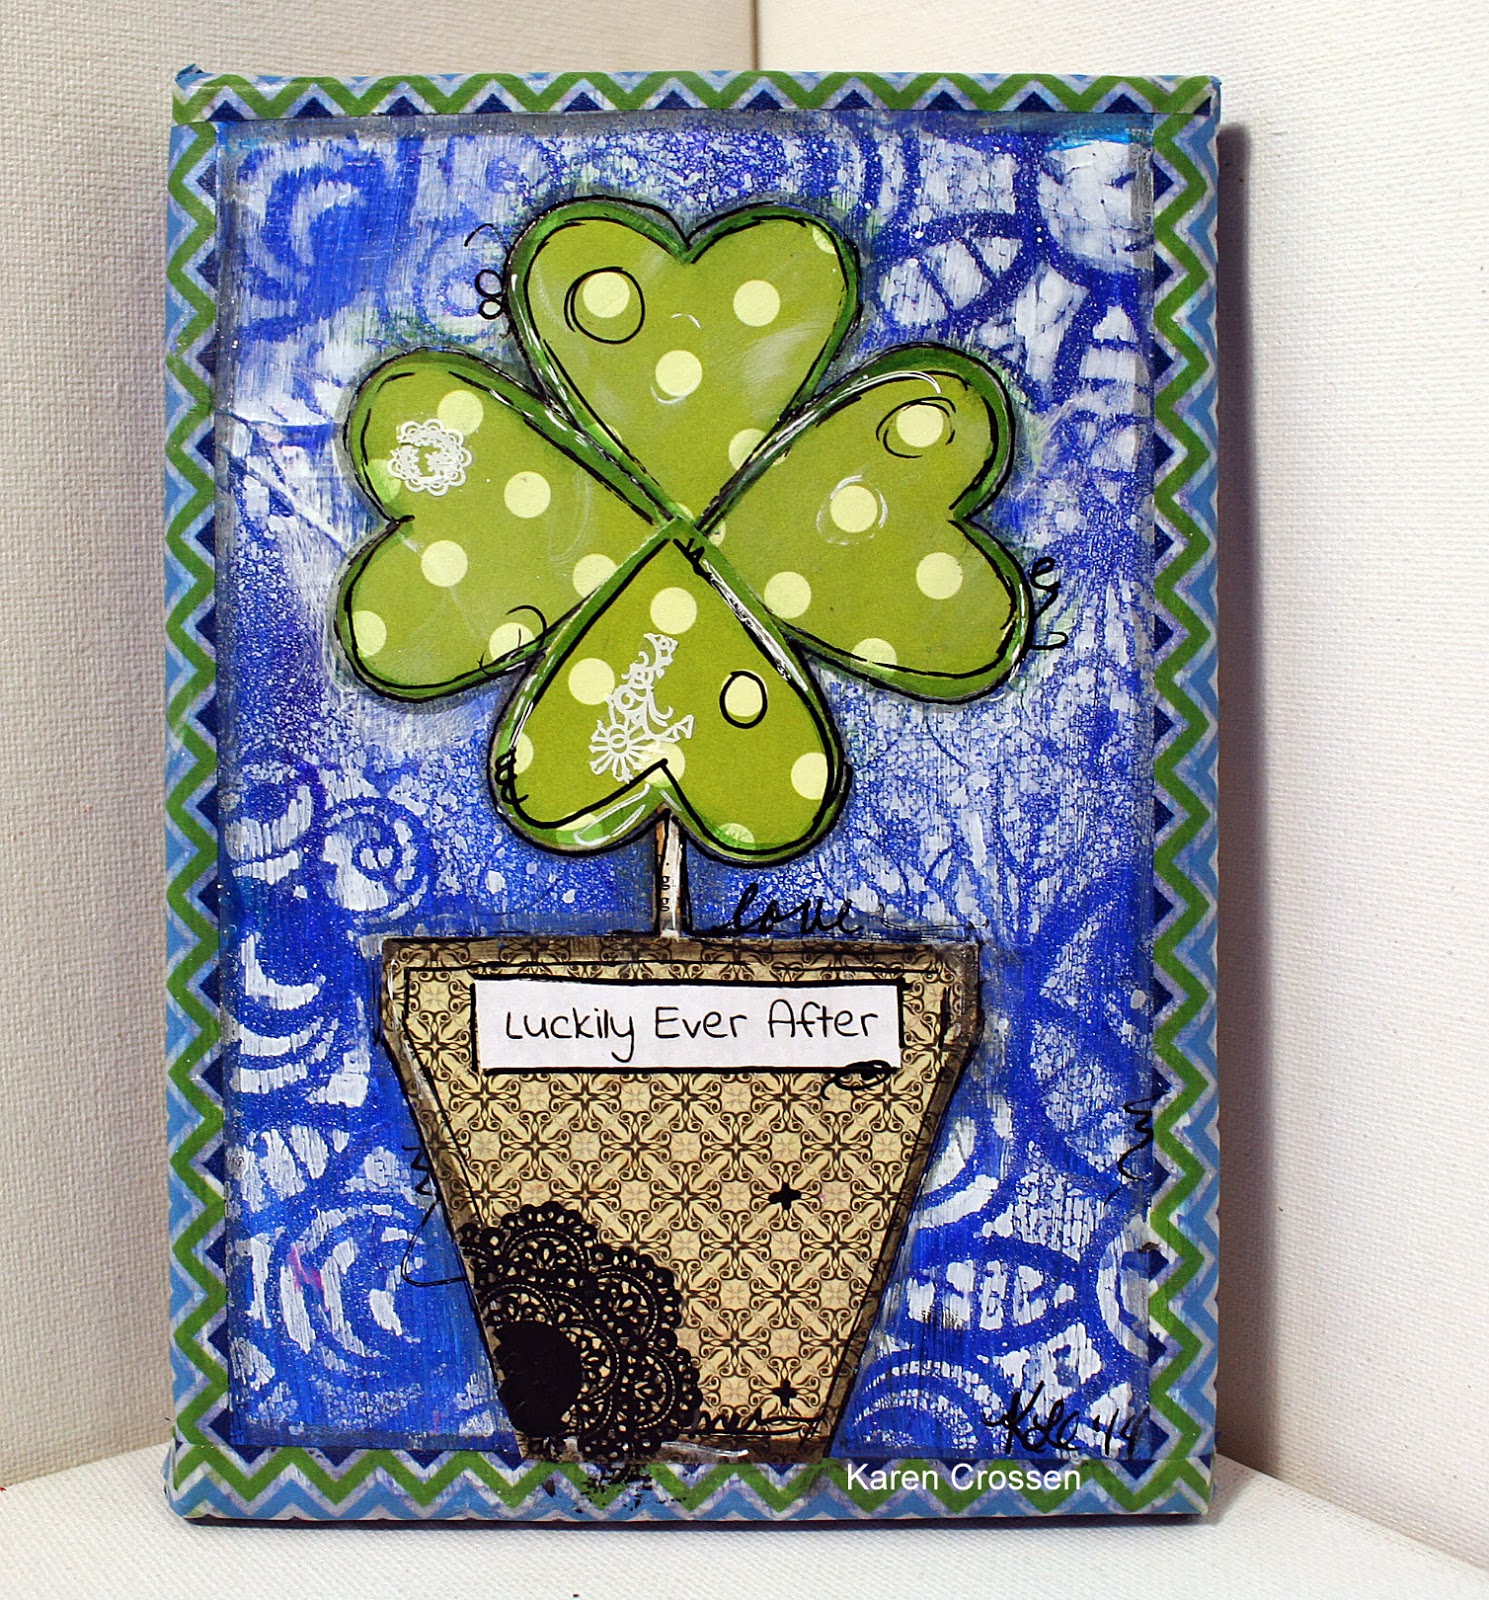
Good Morning!! St. Patrick's Day is coming up so I couldn't help but make a little canvas of a lucky four leaf clover!! This was a super fun little project -I just love the blue and green color combination - it makes me happy!
To see the pictures of my steps, stop by the Eclectic Paperie Blog - and leave me some love in the comments!!
Have a wonderfully lucky day today!! Be sure to shop at the ePaperie with all the new fun products that are coming in - I can't wait to get my hands on a few new items ...
Hi everyone! This week the Journal 52 prompt was Color swatch inspiration and I chose to be inspired by greens!! I really love being challenged each week with a prompt that I haven't thought of myself. It really is a fun challenge!!
I started with pan pastels and just rubbed them onto my journal page and created a base.
Next, I brought out the stencils and added a few more layers ...
And after I was done getting the pan pastel color down, I sealed it with workable fixative.
I really did like the background as it was but I wanted to add a picture to the page and the colors were a little bright. So mixed a little gesso and water to create a wash to mute the greens and purple colors.
Using old paper scraps to create my 'tree' and fence!
Now, came the fun part - what color to make the fence?! I started with a muted green and brown idea. But when I painted up this green color ... and then the teal - I knew I had to go for the color!!
I didn't quite have the right color paper for the job, so I made my own. i stamped on plain white paper. Then colored over the stamp with the awesome Silks Acrylic Glaze!! They are translucent and shiny - what could be better!!??
I added in my purple flowers, doodled and highlighted with pens to finish the page!
Welcome to eclectic Paperie’s ePlay Challenge – Push Your Boundaries! We’re altering
our challenges in 2014, creating one, month-long challenge, increasing
the prize drawing, holding a design team blog hop, and including a
product discount with each new challenge! Check out the details below:
·We’ve
combined our two challenges into one, announced on the first Thursday
of each month. This gives the design team more flexibility with
challenge topics and projects and allows you more time to enter!
·We’ll
also feature a product each month, and during the first day of the
challenge, you’ll receive a discount on the featured product….be sure to
check for the special code!
·Our
prize drawing is increasing from $15.00 to a $25.00 gift certificate
and the winner of each challenge will be announced on the last Thursday
of each month and will be featured on the eP blog.
·Each
month we’ll hold a blog hop featuring the beautiful artwork from our
design team…just scroll down to the bottom of the post for all of the
links! Talk about inspiration!!
Our
challenges are about encouraging you to explore your creative journey
and inspiring you to step outside of your comfort zone. When you submit
your artwork, share a unique card, scrapbook or journal page, a canvas,
home décor project, or anything that you’re excited to share! We’re
looking forward to crafting with you!
Today’s
special is on Liquitex Gesso and for one day only, you can save 10% on
a bottle of gesso…perfect for all of your altered projects! Simply use
code GESSO03 when checking out.
This month’s challenge is: Altering a Book!!
Hello EPeeps!! I am so excited to be hosting the first official ePlay Challenge here on the Eclectic Paperie blog!
I just love altering books and for this project I used an old children's book. (I think my husband would love it if I never bought another old book ... I could probably go at least a year without having to buy a new one to alter!!)
I started out with Gesso and just brushed it on as a surface primer!
Then I wanted texture so I put a stencil into the wet gesso and added more gesso into the stencil. The gesso is thick enough to stand out and create texture in the shape of the stencil!
After the gesso layer was dry, I started with some paint and tissue paper. I actually glued it all down with clear gesso ... loved using the gesso this way! I also used the gesso to glue down the Authentique Abroad paper (love it!) and also stamped a little!
And I was having so much fun and my fingers were so covered in gesso that I didn't take any pictures, sorry! But here is the finished cover, I just love the way it turned out!
The colors of the back were too bright . So I mixed water and regular gesso to make a white-wash to cover the color! Best trick ever to dull down any overly colorful paper or paint!
Voila, the outside is done! I tried to create a little video for you all to see how I use gesso to get the pages ready! Enjoy the video (it is the first one I have ever made, but I have watched hundreds, so go easy on me!)