Saturday, August 31, 2013

I am ready for Fall . . .

I am ready for fall!! We were treated to a wonderfully cool summer (perhaps a little wet) but I never really felt our historically oppressive Atlanta heat and humidity. But this week it hit here with a vengence. Break out the fans, run the A/C and stay inside after noon, Hot-Lanta is back! So here is my wish . . . for the fall trees and cool fall weather. 

It started out on my Gelli Plate with some Golden Titan Buff rolled on to it!


Then I put my Donna Downey Chevron Grunge stencil on top of the painted plate!

I laid down some white tissue paper over the stencil and pulled it off for one pattern.  Then pulled the stencil off the Gelli plate and put another piece of paper down.  When the paper pulled off,  I got the reverse image.  It was beautiful!!  I loved both of them!  There were even little pieces of teal paint speckled over it from the previous Gelli project!


So, I got a little excited . . . I inked up my Jumbo rubber stamp wheel - Say What - from the Scarlet Lime.  I rolled it over the entire canvas panel with brown ink.  LOVE IT! (If I do say so myself!)  


Then I cut out a TON of different size hearts from different paper scraps that I had in my desk.  My desk drawer is a paper scrap dungeon.  Sometimes scraps go in there for later and they never come out . . . but no, today I used those poor scraps.


Breaking out a new favorite art tool, Golden Matte Medium, to cover the canvas to stick down the tissue paper.  After it was down, I also covered the top of the tissue paper with a protective coating of matte medium.

Next, I made a brown paper tree trunk with some extra color on it with some brown and tan neocolors.  Rolled on Glitz roller woodgrain pattern for texture and glued it onto the board.

Now, the next step had me going CRAZY!  For the life of me, I couldn't manage to arrange the hearts the right way.  There was no pattern that made me happy and nothing looked natural.  So I walked away and did some laundry.  Then after a little while I ran back over to my desk, slopped on the matte medium and just threw the leaf hearts on the paper.  No pre-arranging or sticking to a plan . . . just as randomly as I could and still look like the top of tree!  It worked and I felt SO relieved because I really hate it when you think your plan is great but it doesn't work.  But you keep at it and sometimes just throw the plans out the window!   

After the heart leaves were down, I used my Faber-Castell Pitt pens to highlight the edges of the leaves. Took out my doodle pen, some rub-ons, a favorite quote and finished off the picture!  And in the end, even if it wasn't what I originally pictured . . . but it was done and I liked the end result.

Monday, August 26, 2013

Jana - This one is for you!


There are people who inspire you with their faith. Jana, you are one of them.  This one is for you.

Linnie Bloom's Long Canvas Pieces!

Loved playing with my blank canvas piece from Linnie Blooms! I started taking pictures but then I got so caught up in playing, I forgot to take them as I went along! So, here is the final pic and a couple of pics I took as I worked! 


I used the canvas triangle to help me draw out even fence tops!  I used Faber-Castell Gelatos and Pitt Pens, watercolors and acrylic paint for this canvas! What I love about this canvas was the shape, it was so different than a normal canvas.  It has a soft back and thick canvas on the front.  SO cool!  Find them here!

 What are you doing to play today?

Wednesday, August 21, 2013

Little Birdies - Guest Design for Linnie Blooms!

Hi Everyone!! Thank you so much for stopping by to see my second guest design for Linnie Blooms!! Once again I adored using the canvas shapes!!  If you haven't had a chance to browse through the Linnie Blooms store, please click on the link and take a look!  You can also 'Like' the facebook page  or visit the design team Pintrest page for some great ideas!


This was SUPER fun to make!!  I wanted to make something bright and cheery and I found the colors of the Simple Stories I Heart Summer paper to scream out, 'use me today!'   The bird shapes totally inspired me to color them to match!  Playing around with the shapes, I folded the 'sunshine' shape down and thought it looked like a nest ... and voila, the fun begins!! 


I grabbed a fun 12x12 canvas and painted the edges teal.  Next, cutting down the paper to fit into the teal 'frame" I made a cutting mistake on the big paper, so I was scrambling to patch up my hole!! 
 Normally, it would have been 'go with the flow' and would have left it and called it a happy mistake. But I salvaged the scraps of paper left over from another page that had already used and the hole was fixed!  In the end, you don't even notice it . . . that much! Just be careful when you are cutting that you aren't watching something really good on TV . . .

 Then came the REALLY fun part!  Playing with the canvas shapes!!  
 The nest is painted with brown, cream and yellow ocre acrylic paint.  Use a little brush with little strokes to look like the grass and twigs you might find in nest!  And the great thing about making these on canvas is that you can keep layering until you get the look that you like.  The final nests that I made are very thick!  
After the paint dried, I took out some brown embroidery thread.  Now, separating the strands was SO frustrating. How do people do that without pulling their hair out??  I don't know, so I ended up just using it all together and luckily it worked! (Threading the needle was a little challenging!)

I used Faber-Castell Gelatos to color the canvas birds.  It spreads on the canvas like butter. Use a brush with a little bit of water to spread it around.  Pick a couple of your favorite stencils to add detail to the birds! 
 
  Now, for the tree.  Luckily, I just had been to the Binders Art store here in Atlanta before I made this piece.  They always wrap my neocolor crayons up in a long brown bag. I can't tell you how many of these bags I have cut and colored!  This is another one! But whatever supply of brown paper you have, cut out a shape that resembles a tree.  Using the new brown neocolor, I colored  the wrinkles in the paper to give dimension.  When it is glued down, actually scrunch the paper up and the wrinkles stand up and aren't flat on the canvas.


Now, for some leaves . . . cut random green paper in to random leaf sizes!  Layer them onto the top of the tree starting with the bigger ones on the bottom.  When you are gluing down the smaller leaves, only glue one side down and leave the tips up.  This is just another way to create texture and dimension to the project! 

Use pens to highlight edges and doodle and add some rub-ons for more texture.  (I don't have picture of the doodle or white pen.  But I highly recommend you find a doodle and a white pen that work for you!)
  
Glue down the birds in their new homes!! 

I also had a quote that I have been wanting to use.  These birds look they are in love, some good ole' summer loving.  Now, in the picture of this project it looks as if there is a lot of text in the background.  But honestly, when you see the real thing, the black quote stands out way more than the rest of the paper background! 


Thank you for visiting today!! I hope you find something that inspires you today and you put it down on canvas.  I am always surprised just how getting something down makes me feel so great!! It is a rush - and I LOVE it!!  Thank you to Linda Barutha for giving me the chance to design for Linnie Blooms using her new products!!

Make sure to visit:
and

Saturday, August 17, 2013

The Smokehouse


Today it was another dreary, rainy day here in Atlanta.  I feel as if we are growing mold on everything,  along with all the mushrooms that are in the yards.  Gross.  Luckily today the girls were happy doing crafty activities, my hubby was happy with watching tv and I was able to play!  

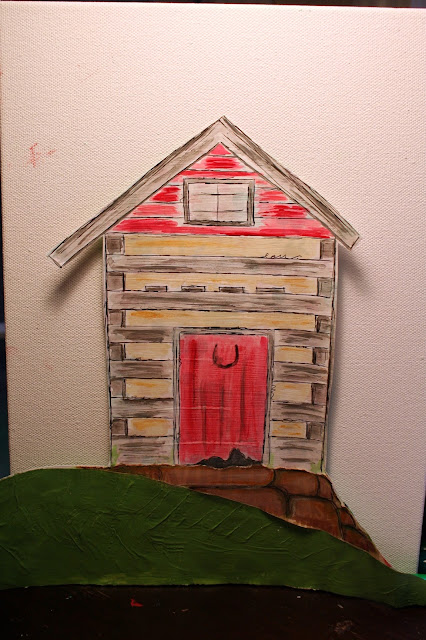
This canvas is based on a journal entry I did about the smokehouse at Don's farm.  The adorable building reminds me of a little cottage but truly was used as meat smokehouse for years. The farm was built in the late 1700's so they really did use a smokehouse!  Today the little building is full of outdoor toys and random stuff. Love the rock base it sits on, the door that is slowly rotting at the bottom, the weathered gray wood and the whitish-yellow chinking between the logs.  I just love this little building.  

 I started with a piece of scrapbook paper from my stash.  The color of green on the paper was an olive-ish color which of course I don't have in a bottle or tube. So out comes my handy-dandy color wheel and the mixing of paint! I actually came up with a color that matched!

Painted up the grass, glued in the rock base and gesso-ed a spot to sketch the smokehouse.
 I watercolored and tried my hardest to leave white space ... I was vaguely successful.   But yuck, the scrapbook paper in the background made my eyes hurt.   Out came the scissors and voila, the background was gone! Aaah, visual relief!
 Now, there might be visual relief but there is a VERY large white space.  In an effort, to use my stash ... I opened up my cabinets and found this old Donna Downey foam stamp that hadn't been used in years.  I colored on it with Faber-Castell gelatos and a brown neocolor and stamped away!! LOVED it!!

  Looking back at the process now, just stamp on the canvas now.  But no, I needed more.  It was raining really hard and I had SO much time on my hands . . . out came the Gelli Plate to add to the large mess on my desk!! (Actually it was at this moment that I looked over at my husband and told him that I need a bigger desk.  He really wasn't amused because he knows that means that someday he is going to come home from work and find a really big desk in the house!)

 This is my gelli print on tissue paper.  Tissue paper makes an awesome background because it is thin and a little bit transparent! I used an old 12x12 mask (which I cannot remember for life of me where or who it came from) and a little bit of white and blue paint. 

After the print dried the trees were stamped right on top of it! The paper was glued down to my canvas with matte medium.  Love that stuff!!
 Finally it all goes together and out come the pens come out for shading and doodling! 
 A couple of rainy hours later, a fun canvas with my favorite little farm building!! Good rainy days!

Thursday, August 15, 2013

Journal pages of fun!

The girls are back in school. Bittersweet but refreshing all at the same time. The house is quiet. The house is clean . . . all except for my desk space. I should probably take a picture of it for you. No, I don't want to scare anyone into thinking that my house looks like my desk! For real, you would be afraid. Now, I know that most mixed media artists and scrapbookers have some kind of hoarding (like my stencils or pens) but it looks like I need a television show to come and clean it for me. I just tell myself a messy desk is a fun desk!!


Here are the two pages that created yesterday and today. They were fun. Ever since we used the Faber-Castell gelatos in the Donna Downey Techniques in Color class, I have been using them for everything. So these two projects used them  to color pretty much everything. The only things that aren't watercolored with gelatos use Pitt Pens. I was SO excited to find out that I could move PITT pen ink around like watercolors on gesso! Who knew!! So the gate piece was a totally new technique for me because I used my brown PITT pen to do most of the color on the fence. So excited!! 


I didn't have a brown gelato . . . go figure.  I have every other color!  I took out my palette paper and started mixing. So fun!!  I did manage to make brown.  I mean I manage to make it when I don't want it, but it sure was hard to find the correct combo when I did need it! Then I found out about the PITT on gesso.  Genius!!  The ink just moved around and I used the brown gelato to change up the color and make it less flat. 


After I finished the brown I started adding in the green. I used the PITT pens to make flowers.  I just put little circles and then watercolored them to make bigger spots!  I didn't like how the fence all ran together though, that was my mistake and some overzealous brushing of color.  So I grabbed my new white China marking pen and broke them apart.  I loved it.  Thank you Sam Flax for having the white pencil!! I have a feeling it will be a constant lifesaver!

In the end I used PITT pens and doodling pens to finish it off!!


Tuesday, August 13, 2013

Ahhh . . . Summer is kinda over . . .

Even though I know we still have a couple of hot months here in 'hotlanta, the kids went back to school yesterday!!  So that means that summer is 'kinda' over for us.  No more sleeping in, staying up late or vacations until the weekends.  Back to the grind.  So today I made a beach picture . . . inspired by Wild Art Summer with Junelle Jacobson!!

I decided to shop my own stash and found a fun SNAP! 6x6 pad from Simple stores.  It totally made me feel like SUMMER!!


This was a pretty easy canvas to create!! The first thing I did was bring out my Gelli Plate! Seriously, love creating backgrounds on it! I wanted something a little different than plain paper so I gritted my teeth and randomly pulled a page out of my vintage atlas.  


I painted white on the bottom and  then mixed in the titan buff through the Turkish Grunge Donna Downey stencil.  I dried it quickly and then added in the teal for the top.  I took out my Blazonry stencil by Julie Balzer and painted teal through it.  The stencil had some darker blue on it from another project, so it was a happy mistake to see the darker blue peeking through!! Love those moments!!
 
Today, I took out a canvas board.  Normally, yes, I would have used a thicker canvas.  However, I bought a pack of these as experiment boards . . . and found out that I love to use them!!  But this one had a sketch gone wrong in the middle and it needed some love! I painted up the edges with some fun bright summery orange and glued the map page on in the middle!!


Finally I cut out umbrella shapes, a bucket, a cooler and some blanket shapes from the Simple stories paper!  Then I glued them and doodled with my Faber-Castell Pitt pens! Love how it turned out!!