Thursday, August 8, 2013

The Little Birdhouse!!

Well, this particular project started off this morning when I covered an old project (gone very wrong) with gesso! (I was super hopeful that I could turn it around!) I had this little sketch in my sketchbook that has been begging to be created and this canvas seemed perfect! 


With a picture plan, the first step is to color the background. Watercolor in the brown posts with either brown watercolors or paint. Then use (my favorite way to get down color fast) . . . gelatos!! Color all around the white gesso with the gelatos. Use a wet brush and give the green gelatos a spin! They move around the gesso really easily! I tend to leave the edges darker!

While you let the background dry, get out some aggression on green pattern paper. Rip up little strips to look like grass or weeds, (whichever you have more of in your yard!) You will need more than you think you will so make sure to rip up a good pile!


Use either Gel Medium or a Mod-Podge-like glue to get the green pattern paper down! Put a couple down and then layer more on top of that! Your fingers should be good and gluey at this point!! 


Beside my desk on the floor was a brown paper bag, but feel free whatever paper you don't mind painting black for the next step. Just get some black paint down! Draw and cut out a shape of a metal hanger! Size it to match the size of the canvas that you are working on! (This was a tricky-ish step, so just be prepared to paint something else black if you need more than one try!!) Then once you have it sized, glue it onto the canvas. If you think the black is too dark, use some gray paint to lighten it up a little!


Now for a little pop of color with flowers! Just draw little white circles with a heavy body paint or modeling paste. Let them dry. Pick a fun paint color and paint on top of the circles with color! (I took out my handy-dandy color wheel and lined up the green grass, yellow for the birdhouse and voila, violet was missing color!)


Finally, it is time to highlight!! Take out some Faber-Castell Pitt Pens that match the greens and a couple of grays! Go around the edges of the paper with greens to make them pop! I also like to use the grays and black markers to do the same but make shadows appear behind them. Use fine-tip black and white pens to doodle and do some more highlighting at this point! 


Draw the birdhouse on watercolor paper. Then watercolor away!! After it dries, use pitt pens to go around the outside and intensify the edges! (Love this step!)


Glue the birdhouse onto the canvas when it is dry! Take some twine or ribbon and make it look like the birdhouse is hanging from the hanger!! I used twine and mod-podged it down!


Now, I used a deep-edge canvas for this project. I find that the edges bother me when they are white so I tend to paint them or cover them. Since this is kinda an outside looking pic, I took some burlap and went around the edges. It is a super easy way to give a good looking finish!! Measure out the burlap and glue it on with gel medium or mod-podge! Super easy and it looks amazing!


Then step back and enjoy what you did!!

Donna Downey was here!!

Last weekend, not only was my BFF Kelli here, but Donna Downey was here in town too!! Donna came to my local LSS, Altered Angel!! We had SO much fun!! Kelli and I signed up for all three classes that she was teaching, left the kids with my hubby and we went to play!! 

Now, not all of my projects are really blog-worthy, but I worked hard on them and wanted to share. I have really decided that I need SO MUCH more pan pastel practice because seriously, they are close to being gesso covered!! 

I can't wait for Kelli to come visit again . . . 


Tuesday, August 6, 2013

Linnie Blooms - Guest Design!

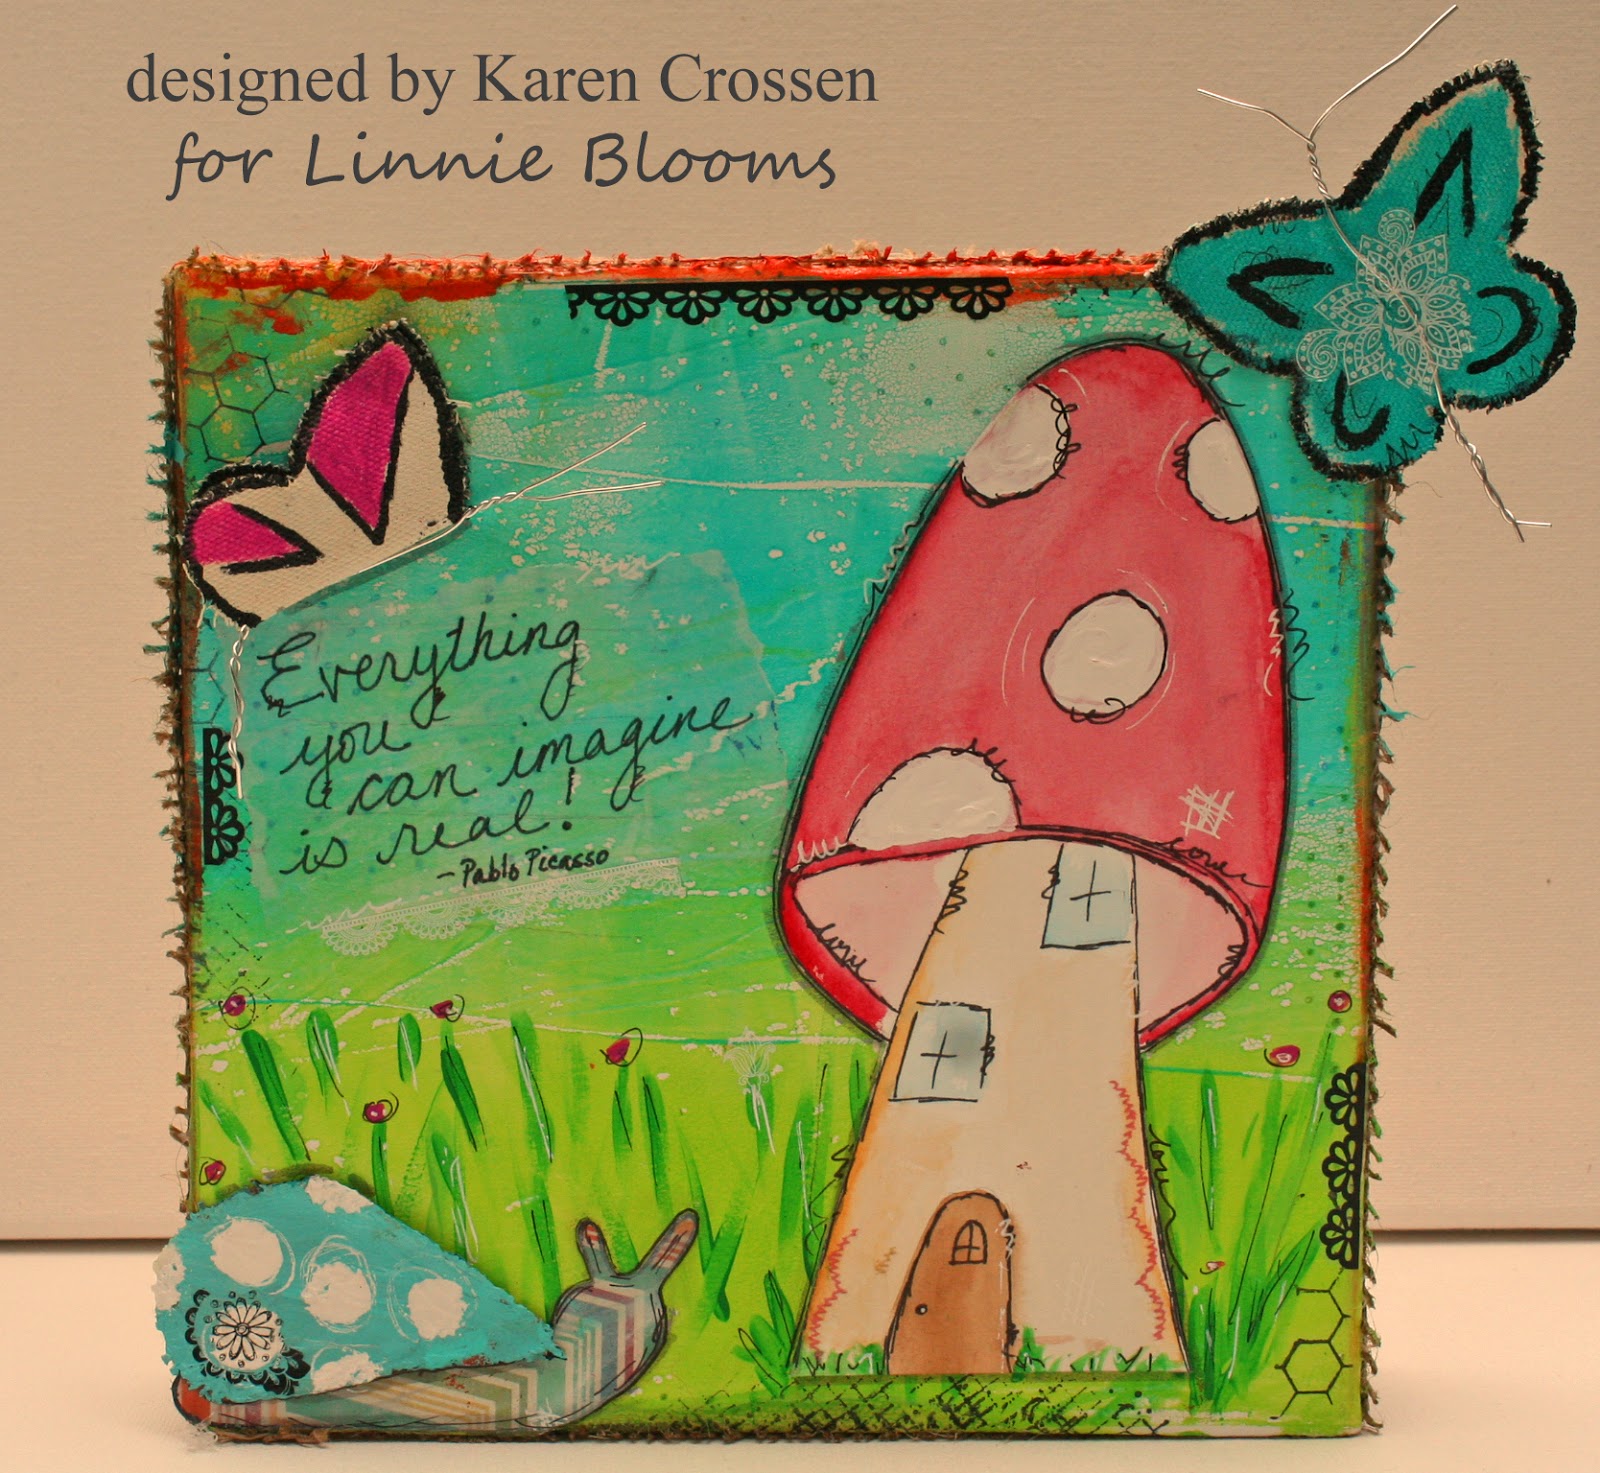
I love playing with blank canvas!! You have so many options for color, texture and shape! Linnie Blooms canvas pieces took color and paint like champions!! It is my privilage to be a guest designer with her team this month! Thank you for stopping by!!


I used a deep edge canvas to create this piece. After I had finished, I wrapped the edges with a piece of burlap! I wasn't sure how it would work, but it REALLY gives the piece a finished look!!  But I am jumping ahead of myself . . . 


First I took a deep breath ... and cut a Linnie Bloom's heart shape in half! 

Then I lightly gessoed each piece of canvas that I wanted to use. . .
After the gesso dried I painted on some of my precious cobalt blue and added some white polka dots!  I also cut a snail shaped piece out of some scrapbook paper! 

Next I outlined the butterflies in black and painted them in with a butterfly design and added some jewelery wire as butterfly 'bodies.'


The background was made on my gelli plate.  I used a light coat of green and blue to make a whimsical looking background!

I watercolored the mushroom, cut it out and started gluing everything down! 

Be sure to check out Linnie Blooms!!
Linnie Blooms - by Linda Barutha


Wednesday, July 31, 2013

Click HERE below to play I Spy with Linnie Blooms!!!   Come see me guest design later this month!!


Saturday, July 27, 2013

Magazine Holder Redo!

Remember I posted this ugly thing . . . 


Some Annie Sloan, Duck Blue . . . and some General Finishes Gel Stain . . . and Voila! It is now a much cuter canvas and paper holder! (please forgive the spot on my lens . . . it was only on a few pics, so frustrating!)


Wednesday, July 24, 2013

Chalkboard Fun!!

So, keeping things simple . . . with The Greeting Farm Garden Variety Tuesday!! I made a card with 'faux' chalkboard paint!! Just plain simple black background with a white 'chalk' Gracie stamped on! I used a white gelato to stamp her originally. I needed to turn up the color though and I used my favorite white gel pen to go over her lines and doodle around her! Simple and fun!!  (Even though the chalkboard was super fun, it was very hard to photograph without major glare!) 

 I also added in the little present. I made the little box with a Linnie Blooms canvas piece. I water colored the canvas and then glued on the ribbon!! 


Then I wanted to play more with the 'faux' chalkboard!! Here is my favorite summer herb . . . basil!! I used Linnie Blooms canvas pieces to make the basil leaves!!


First, I covered the canvas pieces in gesso and the paper with black paint.

My second step was watercoloring the green onto the canvas leaves.  I mixed in  a couple of different greens and the canvas took the color really well!


 I wanted to add a little more texture to the 'basil' leaves.  So I used my handy dandy Distress Ink and a fun Christy Tomlinson stencil! When they were dry I glued them onto the paper and finished off the journal page!


A couple of weeks ago I found some plain wooden frames at The Queen of Hearts Antique and Interiors store in Alpharetta!! I adore that place!!  I painted them up with some Annie Sloan chalk paint, strung some wire from the frames.  Now I can hang my little pieces to dry or display! Fun crafty time around here . . . now to just hang them on the wall!
PS - If you stop by, be sure to leave me a comment!!  I would LOVE to hear from you!!

Thursday, July 18, 2013

Bugs and Exciting Projects!!

First of all, I am SO excited to have been chosen to be a guest designer for Linnie Blooms Design Team!! I can't wait to get my hands on her new line and create!! So much fun!! You can click on the button on my blog and it will take you to her website!!  There are so many talented designers  . . . it is going to be amazing!!

Secondly, I am still in the middle of the Wild Art Summer Class!! This was my watercolor project this week!! I just love that Junelle's classes make me feel like I can be successful no matter what we are doing!! Watercolor? Me?  Well, it is getting better slowly!


Thirdly, it was WAAAY past time to start a new project!! So I found this little old magazine rack at the thrift store. I REALLY want to make it fun again because now . . . not so much cuteness here. So this little guy is now getting a new look! Here are the before . . . and I know you can't wait for the after!! 


Summer is here for sure when the cicadas are singing in the trees!! My brother and I used to catch them when we lived in Texas.  I think we used to find more shells from them rather than live ones, but this guy landed on the deck the other morning and I couldn't help but take pictures, of course!! They really aren't cute. Their wings are so delicate, like a dragonfly, but their eyes are so buggy . . .  but I thought these pics were kinda fun!!